So you want to build a website with WordPress. Congratulations! WordPress is an excellent website building solution. Built on PHP and MySQL, WP(WordPress) powers 33% of all websites. This post explains how to make your WordPress site live within 20 minutes step-by-step.
Let’s find out how?
Step 1: Buy Hosting and a Domain Name
In order to make your website accessible to your users around the world, you need two things: Domain name and a web hosting service.
Domain- Domain name is your website’s name. It is the address of your site that a user types into his browser to access your site.
Hosting- In the simplest words, web hosting offers your website technologies and services needed it to be viewed in the world wide web. Web hosting is the physical location of your site on the internet that houses the information, video, and other content available in your site.
A wide range of hosting options available nowadays. It ranges from shared hosting to VPS hosting to dedicated hosting. Nowadays, even you can get a free WordPress hosting. Some providers offering it are mentioned here: https://hosting.review/web-hosting/free-wordpress-hosting/. If you have a limited budget to make your WordPress site live, you may consider these options.
Once you have chosen and signed up for hosting, you will receive information about how to log in to your account along with your host’s nameservers. Copy this information, and then move to your domain registrar and add the name server information to your domain name. By doing this you tell your domain registrar where this domain name should point to.
Step 2: Install WordPress Software
Nowadays, you don’t need to download the WP script from the WordPress site and then upload to your host. With most hosting provider, you will find single-click WordPress installation option straight from their script library (available in control panel). If you want to make your site live quickly you can use the installation option.
If you are not sure where this option is available in the control panel, take help of your hosting provider. You just need to click on “Install”. The whole process will take a few minutes.
Step 3: Browse Your WP Dashboard
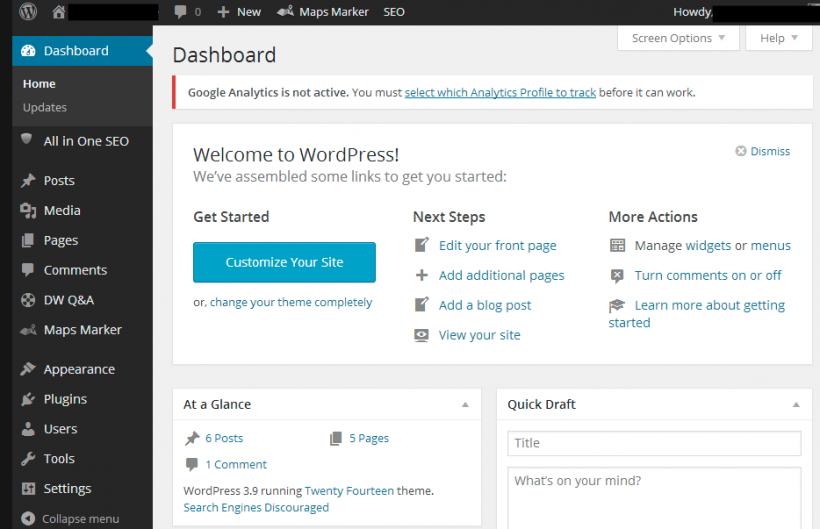
Once you complete the install process, you can access your website’s dashboard by typing “yourdomain.com/wp-admin”. In order to login your website you will have to enter your admin name and password. As soon as you log in you will be taken to your dashboard. On the left side, you will find all the standard option such as:

Dashboard- This is the homepage of your website
Posts: Option to create a post
Media: You can use this option to add media such as pictures, videos, etc.
Pages: Using it you can create static content such as “About Us” page.
Comments: This option allows you to manage and moderate comments coming to your post.
Appearance: The option lets you manage and customize your website’s themes, organize sidebar, widgets and create menus.
Plugins: With this option, you can add, delete and update plugins. Some plugins add features directly to the dashboard menu while others are added as a submenu.
Users: This option helps you manage people who register as guests. Moreover, from here you can give managing permission to other users. For instance, if you have virtual assistants, you may want to allow them to update and make changes to your website.
Step 4: Choose a WP Theme
Although WP offers a default theme, you would like to change it according to the niche of your website. You can search for a theme from the WordPress Theme repository. You can go with the default theme if you like it. To make changes in its aspects such as header, color, etc. you can choose the “Customize” option available under the “Appearance” option.
To install and activate the theme, you simply need to click on “Install” and then “Activate”. It will take a few seconds only.
Step 5: Set up Sidebar Widgets
There are a few widgets that you must set up. Under the “Appearance”-> “Widgets”, you can find a list of different widget options such as “Archives”, “Recent Posts”, “Recent Comments”, etc. The good thing is removing and adding widgets is like a piece of cake.
Step 6: Write Down Your First Post
Before making your WordPress site live life, write down your first post. First, you should create static pages like “Contact me”, “About Me”, etc. To create a new page, go to the WP dashboard and hit the “New Page” button available under ‘Page”. Next, you have to add the title and your content.
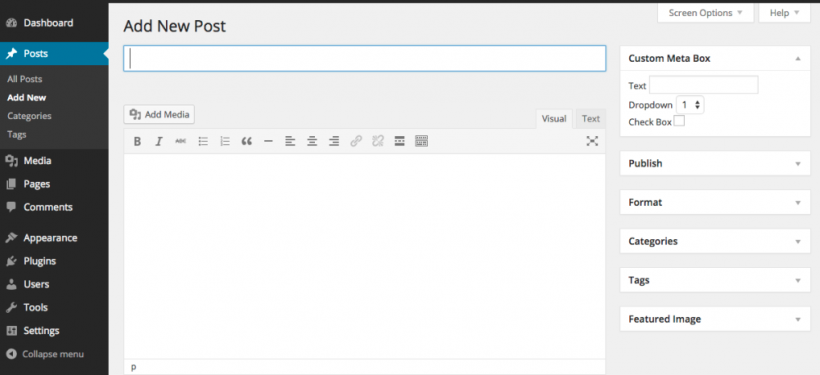
To add your first post follow the procedure given below.

- Log in to your WordPress dashboard.
- Navigate to “Posts” and then click on “Add New”.
- Now you will see the WordPress Editor. Where you can write your blog post using a really intuitive block system.
- To add text, you just need to type.
If you think your post is now ready for publishing. Hit the “Publish” button available in the right corner of the screen.
Step 7: Adding Functionality to Your Blog
There are numerous plugins available that let you add different functionalities and features to your website. If you can think of a feature, most probably, you can find a plugin for it. WordPress community has more than 50,000 free plugins. Some popular plugins that you would like to add to your website are:
Akismet for spam protection.
Google XML Sitemaps for sitemap generation.
Contact Form 7 for creating contact us form.
Jetpack (All in one plugin for designing, marketing, and security)
Congratulations! You have successfully made your WordPress site live. Customize your WP site according to your needs using different plugins.


GIPHY App Key not set. Please check settings